Gazebo Assembly Diagrams
8 Feet Octagon Summerhouse Construction Plans - See Ways To Build A Pavilion Accurately
The end result is a wonderful addition to a backyard patio adding beauty, charm, and character. After the renaissance, the arches were accommodated with arbor designs and the idea of partly displaying and partly hiding the structure gained more popularity and has stayed in fashion. Most home centers would cut the plywood to size for you. You will want to take a square of the project here. With this option, you could add insulation to make it easier (https://pergoladrafts.com/diy-free-standing-pergola-plans-blueprints) to maintain a constant temperature inside. You'll need to get someone to hold a tape measure in the opposite corner and check the diagonal measurement.
Cutting through asphalt shingles will ruin a saw blade. Before you get started, outline or sketch how you will like your summer house to look. You may need to shift the footing slightly to fit. This step by step diy project is about L-shaped summerhouse plans. We stand behind our products with our satisfaction guarantee. Availability varies by market for lumber species and sizes. Cut the sheets at the right shape and size and smooth the edges with sandpaper. The canopy slides easily along the frame allowing you to cover up the arbor for shade and privacy or to leave it open in case you want to enjoy the sunlight.
Feel free to add your own personal touch to the design and to add more features if necessary. We have a few options for you to choose from that would hopefully inspire your new gazebo installation. (click here to read) Their work began by applying roofing felt, starting low and working up towards the peak. This step by step woodworking project is about how to build a pergola roof. In theory, the planks alone would support the roof as a monocoque shell. Beware that both elements come with higher installation and maintenance costs. Using a jigsaw, cut out the tail of the beam. Gazebos come in many shapes and sizes for a variety of yard designs.
Procesando video...
Now, this isn't a small Summer house by any means. This pavilion is super sturdy, but you can increase the slope of the roof to comply with the local building codes. Position the square in place and mark for the cut. Make sure this board lines up perfectly with the first support beam and make sure everything is square and level before you screw these last boards into place. Work with good judgement and don't forget to take a look over the rest of the related plans, as there are many designs and woodworking projects to select from. If you want to use the free plans, follow the free plans.
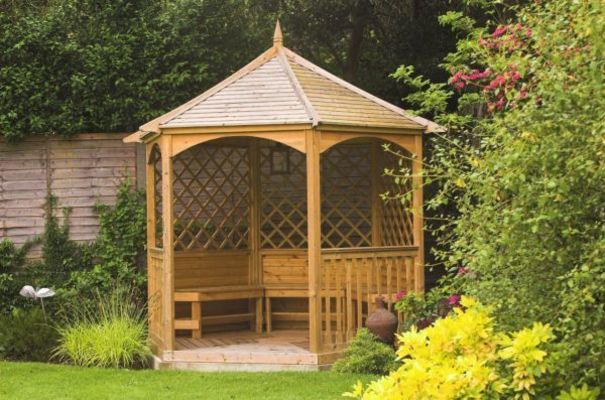
Any construction project, no matter how simple it seems to be, it could be risky especially for a novice. Cut these lines, removing the lower square corners of the block. So, as with the rest of this project, cut the pieces to fit. As pergolas spend their time outside and are exposed to all of the elements, their lifespan would vary based on the material used. It's a 12 ft x 12 ft gazebo with an elegant frame made of solid wood and a rich natural finish. There are many options, starting with fitting the posts directly into concrete, up to pouring concrete footings and placing a support anchors, or securing metal braces to a concrete slab.
Install the eaves by fastening each in place with two 5-inch galvanized drive screws at each end. Use hardware to secure the supports into place tightly. Lean three long boards against the roof support band to serve as a ramp for sliding the first roof section up into place. Start by resting three crossbeams across the eaves at the column positions and nail them into position. Make sure the angles sit flush on the post and bottom chord. Some people use a gazebo as an opportunity to plant trailing plants such as wisteria, honeysuckle or clematis. Building an octagonal arbor is a complex project, as it requires a large investment and quality materials.
If your pergola kit's columns are not an integral part of the floor system, the next step is to bolt them to the base blocks. So we used offcuts of structural timber and cut 45 degree angles on each end with a mitre saw. If you're not comfortable carrying them up a ladder, rent scaffolding. Consider running electricity to the pavilion and installing lighting and a ceiling fan. First cut all of your summerhouse top board ends into a fancy pattern of your choice. Insert the screw in the wall, leaving around 5mm sticking out.