Gazebo Assembly Diagrams
Schematics To Craft Wooden Summerhouse - Proper Steps For Creating a Wooden Summerhouse
The angles turned out fine and it was actually pretty close to the project plan. If you are cutting vinyl siding, you can use a sharp utility knife instead. Slip three or four stainless-steel washers between the ledger and the siding when driving each screw, as shown at left. It is a system that has worked like a charm for long term strength and durability. Screw the 2-by-12 planks to the posts at the bottom and (https://pergoladrafts.com/10-feet-hexagon-gazebo-plans-blueprints) then the top using the decking screws. This means you need to make 30 degree cuts. A bit of soil placed under the low sections would level them.
Later, we drilled holes in the concrete to accept the adjustable post bases. Take time to measure the overhang of each rafter carefully to keep the whole set in alignment. Fasten each beam in place after clamping it to the posts. The goals of great strength and cost make this attractive. Use a spirit level to make sure the joists are horizontal. Look for redwood or cedar, the only woods that will stand up to the elements. All rafters are the same, you just have to add more common girders to the 18' side of the pavilion. In addition, use a spirit level to make sure the support beams are perfectly horizontal.
Attach the second fillet to the other end of the spindles. They are notched to fit around the gable-end rafters. This first part acts as an overview of the process (official website) with detailed instructions for planning and layout. Transfer this mark all around the post. Make sure the corners are square and align the edges with attention. Begin by resting the first 2x8 beam on-center over a pair of supports to ensure the overhangs are of equal length. Pitch is the slope or angle from the wall plate to the roof ridge line. Otherwise you can get skewed, then certainly you will have to redo everything, which obviously would not add you enthusiasm in the work.
Procesando video...
Get to know some of the basics of creating an outdoor room, and discover how you can create relaxation areas, playrooms, and more while adding value to your home. Well, now it's time for some assembly. However, many gazebos built today are integrated into decks and patios to provide convenient shade from the sun and shelter from rain. Treated lumber has come a long way in the past few years. Both hex-head and Phillips-head styles are available. All that's left is to slide your grill into place and invite the neighbors over for a party under your barbecue gazebo. Leave no gaps between the sheets and repeat the process for the opposite side of the roof.
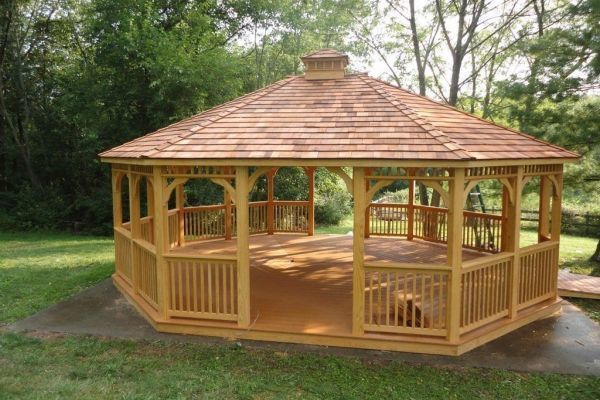
A free-standing gazebo will have four posts, either timber, steel or reinforced concrete columns. Pre-drilling in wood might be important but optional. You can drill them out all at once, and put in the bolts. This is the process of creating a temporary structure of planks that lend some support to the columns while the concrete sets and the stringers are attached to one another. Line length is the measurement from the outside of the supporting wall line to the centerline of the roof at the top of the rise. This is a single support pergola, so you can put it anywhere you want.
Save the removed soil to use elsewhere around your property. Get some assistance because this could be awkward. Properly winterizing your pavilion helps avoid costly winter damage, such as warped or splintered wood. Double check if the supports are plumb and if the corners are square. It was really hard to disassemble so we wound up keeping it up for fall and winter and it took a beating. Begin by measuring and cutting the wood, then move on to installing the rafters and sheathing. If yours isn't, the roof can be handled in any of several ways. Remember, if you're wanting to build a corner Summer house, checking the base would be done the same way.
However, these kits are relatively easy to install and affordable. The way we built it is pretty solid, but over time, lateral stresses from wind, kids hanging from it, and good old gravity could start to rack the structure. The screens are secured on the inside using a 1x1 along just one side, leaving a slot for the screen frame to slide into. Now that we've checked that our garden summerhouse base is square, we want to keep it that way. Leftover pieces could be found all the time.